CCPA Embedded Consent Center Quick Start
Overview
The embedded experience is the quickest and easiest way for you to integrate the WireWheel Universal Preference and Consent Platform (UPCP) into your website. In this walkthrough we are going to cover the 3 simple steps required to fully integrate with your website:
- Configuring Your Consent Center
- Embed Your Consent Center
- Configure Your Tag Manager (GTM Example)
Step 1: Configuring Your Consent Center:
Configuring your consent center can be done from the UPCP product (sign in here). Once logged into the platform follow the instructions below:
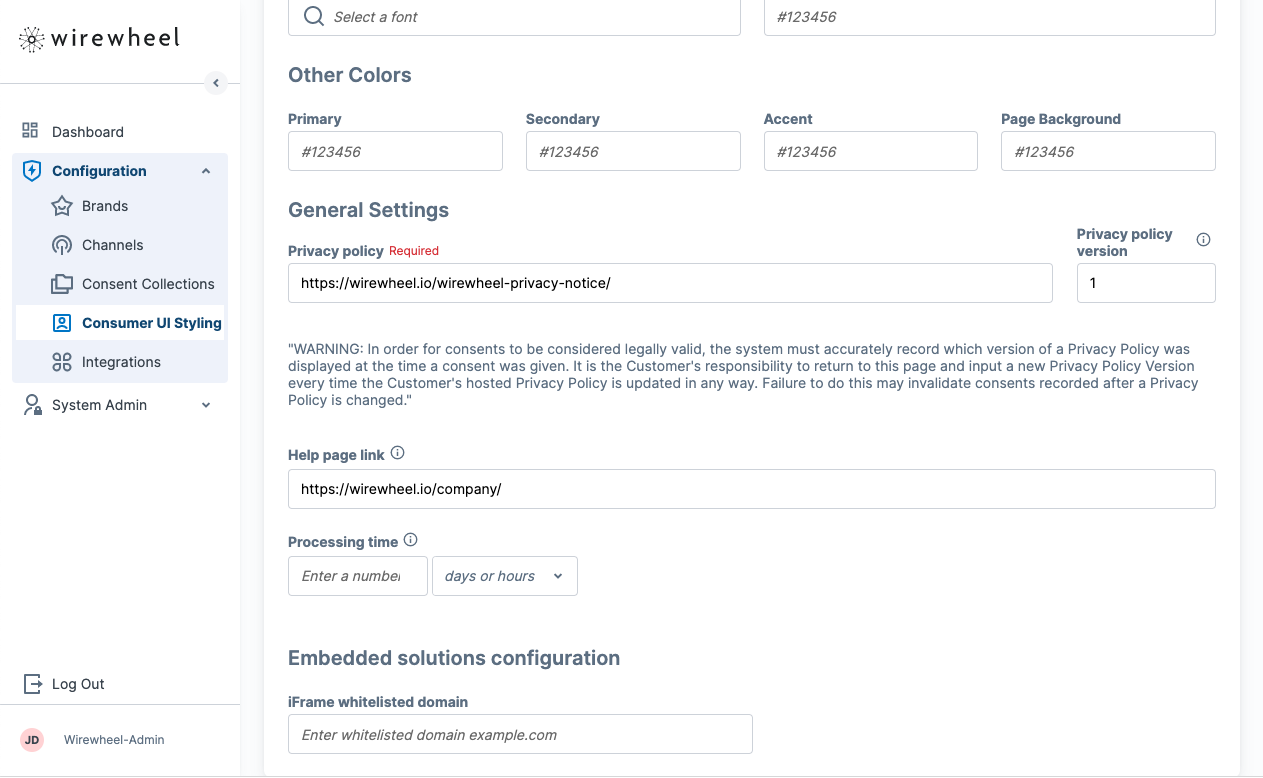
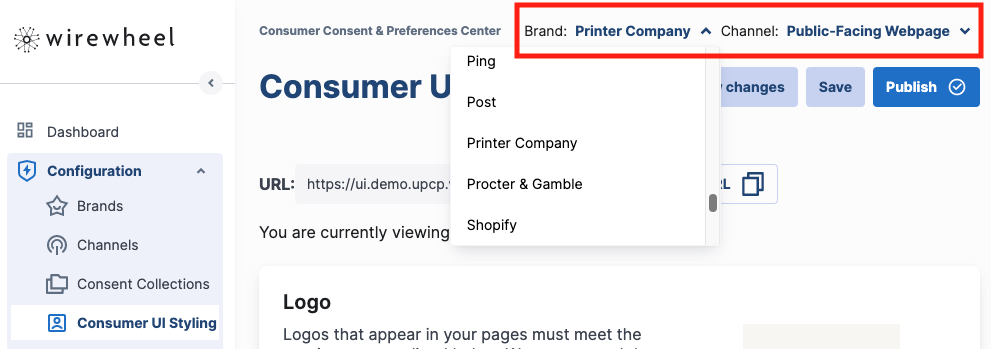
- Navigate to the Consumer UI Configuration in the left sidebar by selecting “Configuration” > “Consumer UI Styling”
- Select the Brand and Channel (Essentials+*) that you would like to configure your Consent Center for. For information on how to configure brands, channels, and consent collections, please checkWireWheel University’s Welcome to UPCP course.
 *Lite customers are limited to one brand and one channel by default. As such, lite customers will be unable to select anything but the default brand and channel.
- Configure your consent center:
- Upload your logo.
- Add a link to your website homepage.
- Add a link to your privacy policy and version.
- Configure your iFrame whitelist domain (this should be the website domain you are embedding the consent center on ex. “wirewheel.io” for the website https://www.wirewheel.io).
- Save and preview your consent center.
- Click the Publish button when you are done.
Step 2: Embedding the SDK and Your Consent Center:
Embedding the WireWheel SDK:
The SDK is a powerful tool that allows you to add additional functionality and features to your website. In this section, we'll walk you through the steps of embedding the SDK onto your website using JavaScript tags.
Prerequisites:
You will need the ability to add Javascript to the <head> section of every page on your website.
You have an account with access to login to the UPCP platform.
Configuration Variables
We have built the WireWheel UPCP SDK’s to be configurable to enable the flexibility you need to comply with various privacy laws. Here is a quick overview of the current UPCP configuration options for configuring consents on your website:
| Field | Source |
|---|---|
| wwupcp_apiurl | Non-Production: https://api.uat.upcp.wirewheel.io/v2 Production: https://api.upcp.wirewheel.io/v2 |
| wwupcp_apikey | Channel specific field. See Figure 1. |
| wwupcp_cookie_domain | This is the top-level domain for the page hosting the script. |
| wwupcp_cookie_duration | 365 is the recommended value |
| wwupcp_cmp_default_consents | This field is an array of objects that describe the consents that this solution applies to. See Figure 2 for the source of the Target field. For an opt-out solution, action should be set to 'ACCEPT'. For an opt-in solution, action should be set to 'REJECT'. |
Step-by-Step Instructions:
- Paste the following JavaScript tags into the
<head>tag of your website. This should be the first script loaded to ensure the privacy choices are initialized before other marketing scripts fire.
<script type="text/javascript">
 window.WireWheelUPCPConfig = {
  // The WireWheel's CMP API URL.
  'wwupcp_apiurl': 'https://api.upcp.wirewheel.io/v2',
  // The WireWheel's CMP API key.
  'wwupcp_apikey': '<API key goes here>',
  'wwupcp_cookie_domain': 'www.customersdomain.com',
  // The cookie default expire time in days.
  'wwupcp_cookie_duration': 365,
  // List of CMP default consents.
  'wwupcp_cmp_default_consents': [
    {
      'target': 'doNotSell',
      'action': 'ACCEPT'
    }
  ],
};
</script>
<script type="text/javascript" src="https://s.upcp.wirewheel.io/sdk/upcp-sdk-0.9.2.min.js"></script>
<script type="text/javascript" src="https://s.upcp.wirewheel.io/sdk/upcp-sdk-bridge-1.3.4.min.js"></script>
- Adjust the configuration variables to replace placeholder values with your configurations.
Embedding Your Consent Center
In this section, we'll walk you through the steps of embedding your Consent Center onto your website using an iframe tag.
Step-by-Step Instructions:
- Select the Brand and Channel (Essentials+) that you would like to configure your Consent Center for.
- For Trial and Lite accounts, you will only have 1 channel available and it will be pre-selected.
- Navigate to the Consumer UI Configuration in the left sidebar by selecting “Configuration” > “Consumer UI Styling”
- Click the “Copy” button next to the URL at the top of the page.
- Navigate to the page on your website where you want to embed the Consent Center.
- Paste the following snippet into your page:
<iframe id="wwiframe" src="[YOUR CONSENT CENTER URL]" width="[WIDTH]" height="[HEIGHT]" frameborder="0"></iframe>
<script type="text/javascript">
const { WireWheelSDK } = window.cmpJavascriptSdk;
const embeddedHandler = WireWheelSDK.initEmbeddedParent({
  targetIframe: document.getElementById("wwiframe")
});
</script>
- Replace [YOUR CONSENT CENTER URL] with the URL you copied in step 3, and adjust the [WIDTH] and [HEIGHT] to fit your website's design.
- *If scripts are not allowed in your content areas, you may need to work with your development team to add the <script> to your page. If this is the case, request that they load it right before the closing </body> tag. It needs to fire after the iframe is loaded on the page.
- Save the changes and view your embedded consent center!
Step 3: Configuring Your Tag Manager (Events based)
In this section, we are going to walk through configuring your Google Tag Manager to conditionally fire tags based on a users selection.
Prerequisites
In order to follow this documentation, we assume you have:
- A Google Tag Manager account created and embedded on your website..
- Completed Step 1: Configuring Your Consent Center and Step 2: Embedding the SDK above.
To configure Google Tag Manager (GTM) to listen to events pushed into the Data Layer follow these steps:
Create Variables
In UPCP, each consent center will connect to a consent collection defined in UPCP. Every consent inside a Consent Collection has a corresponding API target. Inside Google Tag Manager, we’ll need to create variables with default consent statuses that match the API Targets in UPCP.
- Navigate to "Variables" in the side menu of the Google Tag Manager.
- Click on “New” under the user defined variables section.
- Select "Data Layer Variable" as the new variable type.
- In the top left, name the variable "[Consent api_target][Consent api_target] Variable".
- “[Consent api_target][Consent api_target]” → Please insert here the value of your consent api_target from your “Consent Collection” configuration.
- This value can be found by visiting the consent collection, navigating to a consent’s edit page, and finding the API Target defined for the consent.
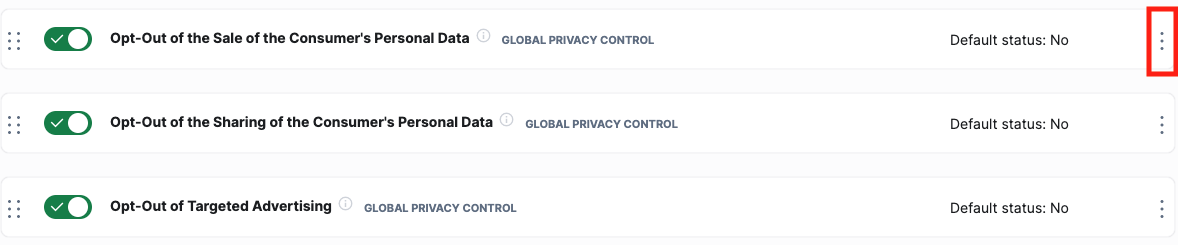
Navigating to the edit page.
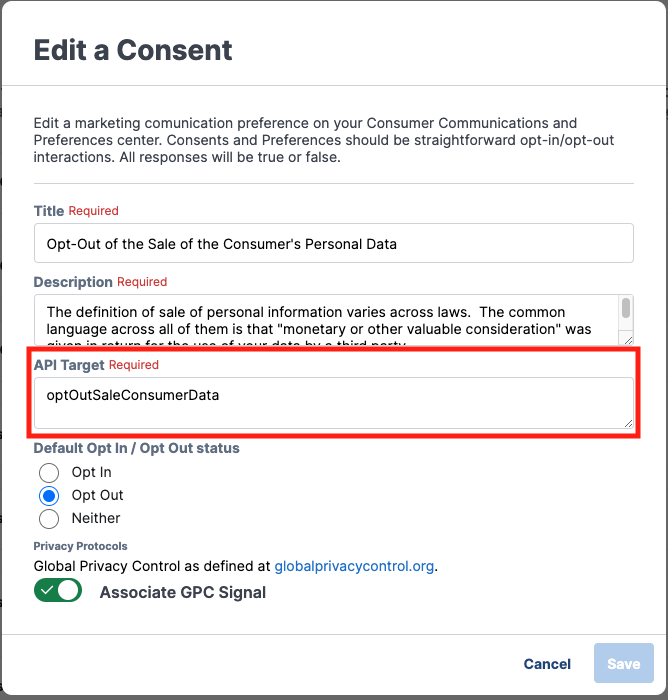
Finding the API_Target
- Under "Data Layer Variable Name", insert the consent “API Target” (the same value as [Consent api_target][Consent api_target]) e.g “doNotSell”.
- The name has to match exactly the “API Target” configured in the product for this consent.
- Check the "Set Default Value" checkbox and set the default value to false.
- Save your new variable.
- Repeat for all consents in your consent collection.
Add Triggers
There are several ways on how to implement triggers in a Tag Management System. WireWheel recommends the following option:
- Navigate to "Triggers" in the side menu of Google Tag Manager.
- Click “New”.
- Select "Custom Event" as the trigger type.
- In the top left, name the trigger "[Consent api_target][Consent api_target] Trigger".
- “[Consent api_target][Consent api_target]” → Please insert here the value of your consent api_target from your “Consent Collection” configuration.
- Check the "Use regex matching" checkbox next to the "Event Name" input field
- Under "Event Name", insert "(consent-status.*)".
- Check the "Some Custom Events" checkbox.
- In the drop-down menus, set the following condition: “[Consent api_target][Consent api_target] Variable” contains true.
- Save "[Consent api_target][Consent api_target] Trigger".
- Add the trigger to the relevant tags inside of GTM
- This should be the trigger of any tag in GTM that needs to be conditionally fired on this consent.
- Repeat this for each consent configured in your consent center that is relevant to your tag management implementation.
Updated 18 days ago